You’re halfway down the highway, your range is dropping fast, and you finally spot the sign for a fast charging station. You pull in, and there it is: a row of central chargers, cables hanging down, cars parked every which way, and that urgent question — which side do you park on, and how do you plug in without creating chaos around the charger?
Pull Through charging sites are becoming increasingly common across Canada’s major fast charging networks. They’re designed to be easier to access and more efficient, but they require a few basic habits that nobody may have ever explained to you. This guide covers everything — from vehicle positioning to crossed cables and special cases.
Understanding a Pull Through site in 30 seconds
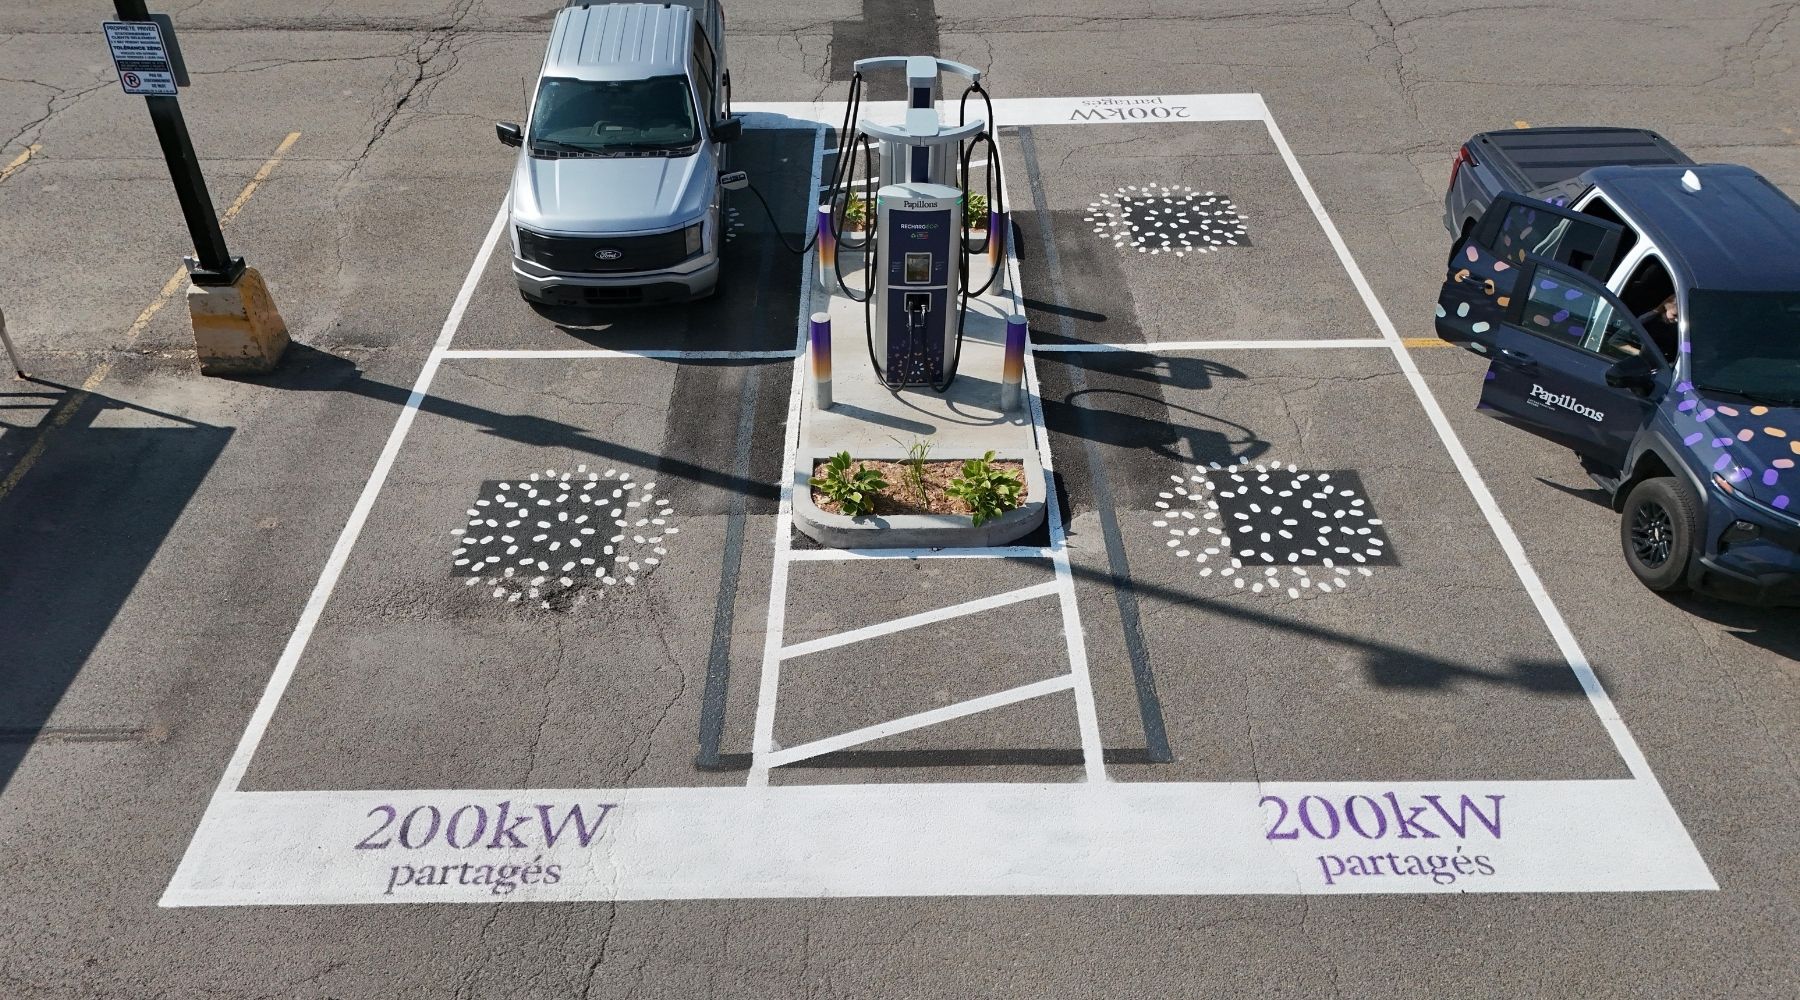
A Pull-Through site is a charging station configuration where the charger is installed at the centre of an island, with parking spaces on either side. A vehicle pulls in from one side, parks, plugs in, and drives out the other side without having to reverse — hence the name “pull through.”
Operators favour this format for one simple reason: this charger layout accommodates a wider range of electric vehicles, such as recreational vehicles and vehicles towing a trailer. Traffic flows more smoothly, manoeuvring is reduced, and spot turnover is naturally optimized.
Not to be confused with Pull-in chargers (the classic parking layout, where chargers are in a line and the vehicle parks perpendicular to the unit). On a Pull Through site, the charger is always between you and the vehicle across from you — and that’s exactly what makes the few rules you’re about to learn so important.
The key to everything: knowing where your charging port is
Before even thinking about positioning, there’s one fundamental thing to know about your own vehicle: where is its fast charging port? This detail — trivial when you charge at home with your wall charger — becomes critical at a Pull Through site where the cable is only 13 to 16 feet long.
Your vehicle’s native app usually displays a diagram showing the port location. Five seconds of checking before you leave home, and you’ll arrive at the charger knowing exactly what to do.
Port location by vehicle: the reference table
Here are the confirmed port positions for some of the most common models in Canada. Note: some models changed port position for 2025 and later model years, notably following the adoption of the NACS connector.
| Port location | Vehicles |
|---|---|
| Rear left driver's side |
Tesla Model 3, Model Y, Model S, Model X (all trims, all years) · Polestar 2 and 3 · Volvo EX30, EX40, EC40, XC40 Recharge · GMC Hummer EV · Chevrolet Silverado EV · GMC Sierra EV
ℹ️ Kia EV6 from 2025 onwards — Light, Wind and GT-Line trims only (the GT retains the rear right port)
|
| Front left driver's side | Ford Mustang Mach-E · Ford F-150 Lightning · Chevrolet Bolt EV and Bolt EUV · Chevrolet Blazer EV · Cadillac LYRIQ · Rivian R1T and R1S · Lucid Air · Subaru Solterra · Toyota bZ4X |
| Rear right passenger's side | Hyundai Ioniq 5 and Ioniq 6 (all years) · Kia EV6 2021–2024 and EV6 GT (all years) · Kia EV9 · Genesis GV60 · Volkswagen ID.4 and ID. Buzz · BMW i4, iX, i5 · Audi Q4 e-tron · Mercedes EQS, EQE, EQB |
| Front centre / front right passenger's side |
Nissan Leaf — front centre (middle of the hood)
Nissan Ariya — front right (passenger's side)
Hyundai Kona Electric — front centre (some models)
|
Important note on transition years:
Many manufacturers are switching to the NACS connector on their 2025 and 2026 models. This change sometimes comes with a repositioning of the port. Always verify the exact location for your specific model year if you have a recent vehicle.
How to choose the right spot and the right entry direction
The positioning rule comes down to one sentence: park so that your charging port ends up on the side facing the central station, within 6 feet of it.Port at the front of the vehicle — pull forward into the spot
If your port is at the front left (Bolt, Mach-E, Lightning, Rivian…): choose the spot to the left of the station and pull forward until the front of your car is level with the station. Your port will naturally end up facing the cable. If your port is at the front right or front center (Ariya, Leaf…): same logic, right side of the station, pull forward. The visual reference: the front of your hood should be aligned with the central housing of the station — not short of it, not past it.Port at the rear of the vehicle — back into the spot
If your port is at the rear (Tesla, Ioniq 5, EV6, BMW i4, Polestar…), you have two options depending on the site layout. Option A — reverse in: back into the spot until the rear of your vehicle is level with the station. This is the most precise maneuver, especially on well-sized sites. Option B — pull past the station: pull forward into the spot, going slightly beyond the station so that your rear ends up level with it. This option works when the spots are long enough. In both cases, the reference stays the same: your port must end up within six feet of the station, on the correct side.The cable test — eyeball the distance
From your spot, look at where your charging port is relative to the station and estimate whether the cable can reach it with a natural slight curve. If you have any doubt, it’s better to reposition before starting the session rather than after. The idea is simple: the cable should reach your vehicle without being taut, but without dragging on the ground either — a cable looping on the ground is a hazard for pedestrians and other drivers.
The number one mistake: crossed cables
This is the situation that creates the most tension at Pull Through charging sites, and that can also cause real physical damage. Two vehicles on either side of the station, both plugged in, with cables crossing in an X between the two cars. The result: taut cables that can cause trips, falls, or other safety hazards.Why this is serious
A cable under crossed tension can become damaged and may prevent another vehicle that needs the full cable length from charging. A damaged CCS, NACS, or CHAdeMO connector on the station side puts the station out of service until a technician can intervene. The charging port on the vehicle side can also sustain damage to the inlet, or even to the charge port door. A crossed cable on the ground is also a real tripping hazard for passersby, children, and people with reduced mobility.The two-sides rule
The simple rule that applies to the vast majority of situations: each vehicle plugs in on its own side of the station. The cable from the vehicle parked on the left stays on the left. The cable from the vehicle parked on the right stays on the right. They never cross. Before choosing your spot, check whether a vehicle is already plugged in on the other side of the station and note which side its cable runs down. Imagine a straight line between the station and your charging port: if that line does not cross your neighbor’s cable, you are correctly positioned. If it does cross, adjust your approach, pull back further, or choose the spot on the other side if possible. The adaptation rule: if you arrive after another EV is already plugged in, it is up to you to adapt your positioning to theirs — never the other way around. The first to arrive has set the station’s configuration.
Good habits at every step
Before plugging in- Turn off your vehicle and engage park mode — some EVs only open the charge port door when the parking brake is engaged.
- Open your vehicle’s charge port door and make sure to remove any protective cover from the charging port.
- Take the full length of the cable in hand before connecting it: never pull on a partially coiled cable, as you risk bending the connector or damaging the cable management system.
- Briefly inspect the connector — any deformation, bent pins, or a burning smell are warning signs. Do not force it; switch to a different connector or station.
- Finally, make sure the cable is not running under your tires or those of the vehicle next to you.
Plugging in — the signs that confirm it’s working
Insert the connector firmly until you hear a click or feel the locking signal. Most fast chargers confirm the connection with a green or blue LED and/or an audible beep. On your vehicle, the charge port door typically lights up green or blue when charging actually begins. If none of these signals appear within 30 seconds of plugging in, unplug, reconnect, and verify that your session was properly initiated through the network app or by payment card.During charging
- Although the communication system normally prevents any movement while the cable is connected, a technical fault could make it possible. In that exceptional scenario, never force the movement: a lateral twist on a locked connector would cause irreparable damage to the port.
- If you need to open the trunk or a rear door on the station side, first check that the cable has enough slack to absorb the movement.
- Monitor progress through the charging app, your vehicle’s app, or the station screen — you don’t need to stay in your car, but remain reachable to respond to an alert and move your vehicle when charging is complete (this will also help you avoid idle fees).
After charging — in order
- Unlock the charging port using the button on your vehicle (touch or physical) or directly on the station screen, before touching the cable. The charge port LED typically changes from green to blue, white, or turns off to indicate it is unlocked.
- Remove the connector with a firm, straight pull — never at an angle.
- Place the cable back neatly on the station’s cable holder. A cable left hanging or dropped on the ground risks damage.
- Free up the spot.
Special situations: vans, trailers, and extreme cold
Electric vans and large SUVs
Ford and Rivian electric vans and SUVs have their charging port on the front left: the F-150 Lightning and R1T/R1S simply drive forward into a Pull-Through spot, like a sedan with a front port.
GM’s Silverado EV and Sierra EV, on the other hand, have their port on the rear left—they must therefore reverse into the spot so the port ends up on the charger side, as one would with a conventional rear-port vehicle.
In all cases, pay attention to the length of these vehicles. The F-150 Lightning is nearly 5.9 meters long—visually check that you are not overhanging into the traffic lane before turning off the ignition.
Vehicles with trailers
This is one of the major advantages of the Pull-Through format: an EV towing a trailer can charge without unhitching. Position yourself so the trailer extends toward the site exit, not toward the charger or another vehicle. If your port is at the rear (Tesla, for example), check that the cable is long enough to go around the hitch—16-foot cables usually work, but this is not always the case with older 11-foot chargers. Vehicles with front ports (F-150 Lightning, Silverado EV, Rivian) are significantly more practical when towing at a Pull-Through site.
In extreme Canadian cold—specific precautions
Winter cold adds a layer of complexity to charging. The cable hardens at -20°C or lower—it loses its natural flexibility and can crack if bent abruptly. Handle it gently, handle it slowly, and never place it on frozen ground where it could get stuck under a tire or rigidify in an awkward position.
The connector can freeze if the charger has been inactive in extreme cold. Slight resistance during insertion is normal—do not force it. Wait a few seconds for the heat from your hand to slightly defrost the contacts, then try again.
Note: For an optimal charging experience, your battery must first precondition before accepting the full power of the fast charger. Do not worry if the power displayed on the charger is low at first—it will increase gradually (more challenging in extreme cold). Recent EVs (Tesla, Hyundai, Kia) automatically precondition the battery when you navigate to a charger in the app, which reduces this latency.
When the only available spot is on the wrong side
This happens, especially during peak times—ski weekends, long weekends, summer getaways. Here are your options in order of relevance.
- Wait 5 to 10 minutes for a spot on the correct side to become available. At well-designed sites, turnover is fast—a fast charging session rarely takes more than 30 to 40 minutes.
- Check if the cable still reaches your vehicle’s charging port. On some chargers equipped with 16-foot cables or longer, it is sometimes possible to reach the port from the opposite side—without crossing the neighbor’s cable and without excessive tension. Test before confirming your position.
- Look for an alternative charger. At multi-charger sites, another charger may have the ideal spot available. The network app provides real-time availability.

FAQ — Pull Through Charging Sites
6 frequently asked questions about DC fast charging stations in Pull Through configuration in Canada
-
A Pull Through site is a charging station configuration where the charger is positioned in the center of an island, with parking spaces on each side. Vehicles enter from one side, plug in, and exit from the other without reversing. This format is increasingly common on DC fast charging networks in Canada.
-
First identify the location of your vehicle's charging port (see the table in the article). Always park so that this port ends up on the side of the central charger, within 7 feet. Estimate the cable length visually before finalizing your position.
-
A cable stretched diagonally across can be ripped off if a vehicle leaves without checking, damaging the connector on both the charger and vehicle sides. It also creates a tripping hazard for pedestrians and prevents neighbors from accessing their trunk or doors. The rule: each cable stays on its own side of the charger, never crossing the neighbor's.
-
First check that your vehicle's charge port door is unlocked (LED on or app confirmed). Inspect the connector—a bent pin or debris can prevent insertion. In extreme cold, ice can slightly block contacts: wait a few seconds before trying again without forcing. If the problem persists, switch connectors or chargers and report the fault via the network app.
-
Yes, and this is one of the advantages of the Pull Through format. You do not need to unhitch the trailer. Position your vehicle so the trailer extends toward the site exit. Vehicles with front ports (F-150 Lightning, Silverado EV, Rivian) are most practical in this situation.
-
No. Recent chargers have liquid-cooled cables 13 to 16 feet long, flexible even in extreme cold. Older chargers sometimes have cables 9 to 11 feet long, less flexible. When discovering a new site, always visually evaluate the cable reach before finalizing your position to ensure it will reach your port.